AECS7000
Short User Manual
www.philips.com/welcome
Always there to help you
Register your product and get support at
Question?
Contact
Philips
www.philips.com/welcome
Always there to help you
DS8900
Register your product and get support at
Question?
Contact
Philips
Short User Manual
Stručný návod k rychlému použití
Kurzanleitung
Σύντομο εγχειρίδιο χρήσης
Manual de usuario corto
Lyhyt käyttöopas
Bref mode d'emploi
Rövid használati útmutató
Kort brugervejledning
HU
EN
CS
DE
DA
ES
EL
FI
FR
All registered and unregistered trademarks are property of their respective owners.
2013 © WOOX Innovations Limited. All rights reserved.
Philips and the Philips’ Shield Emblem are registered trademarks of Koninklijke Philips
N.V. and are used by WOOX Innovations Limited under license from Koninklijke
Philips N.V.
DS8900_10_Short UM_V1.1
e
g
h
i
j
k
djay 2
EN
EN
EN
EN
EN
EN
EN
Djay 2
djay 2
CS
DA
DE
CS
DA
EN
DE
CS
DA
DE
CS
DA
DE
DE
EN
EN
CS
DA
DE
CS
DA
119.0
119.0
f
a
b
c
d
CS
DA
DE
Bluetooth ON
M1X-DJ
EN DA
CS DE
DA
DE
EN
CS
CS
DA
DE
CS
DA
DE
EN
CS
EN
DA
DE
CS
DA
DE
CS
DA
DE
EN
CS
DA
DE
8 x 1.5V R20/UM1/D batteries
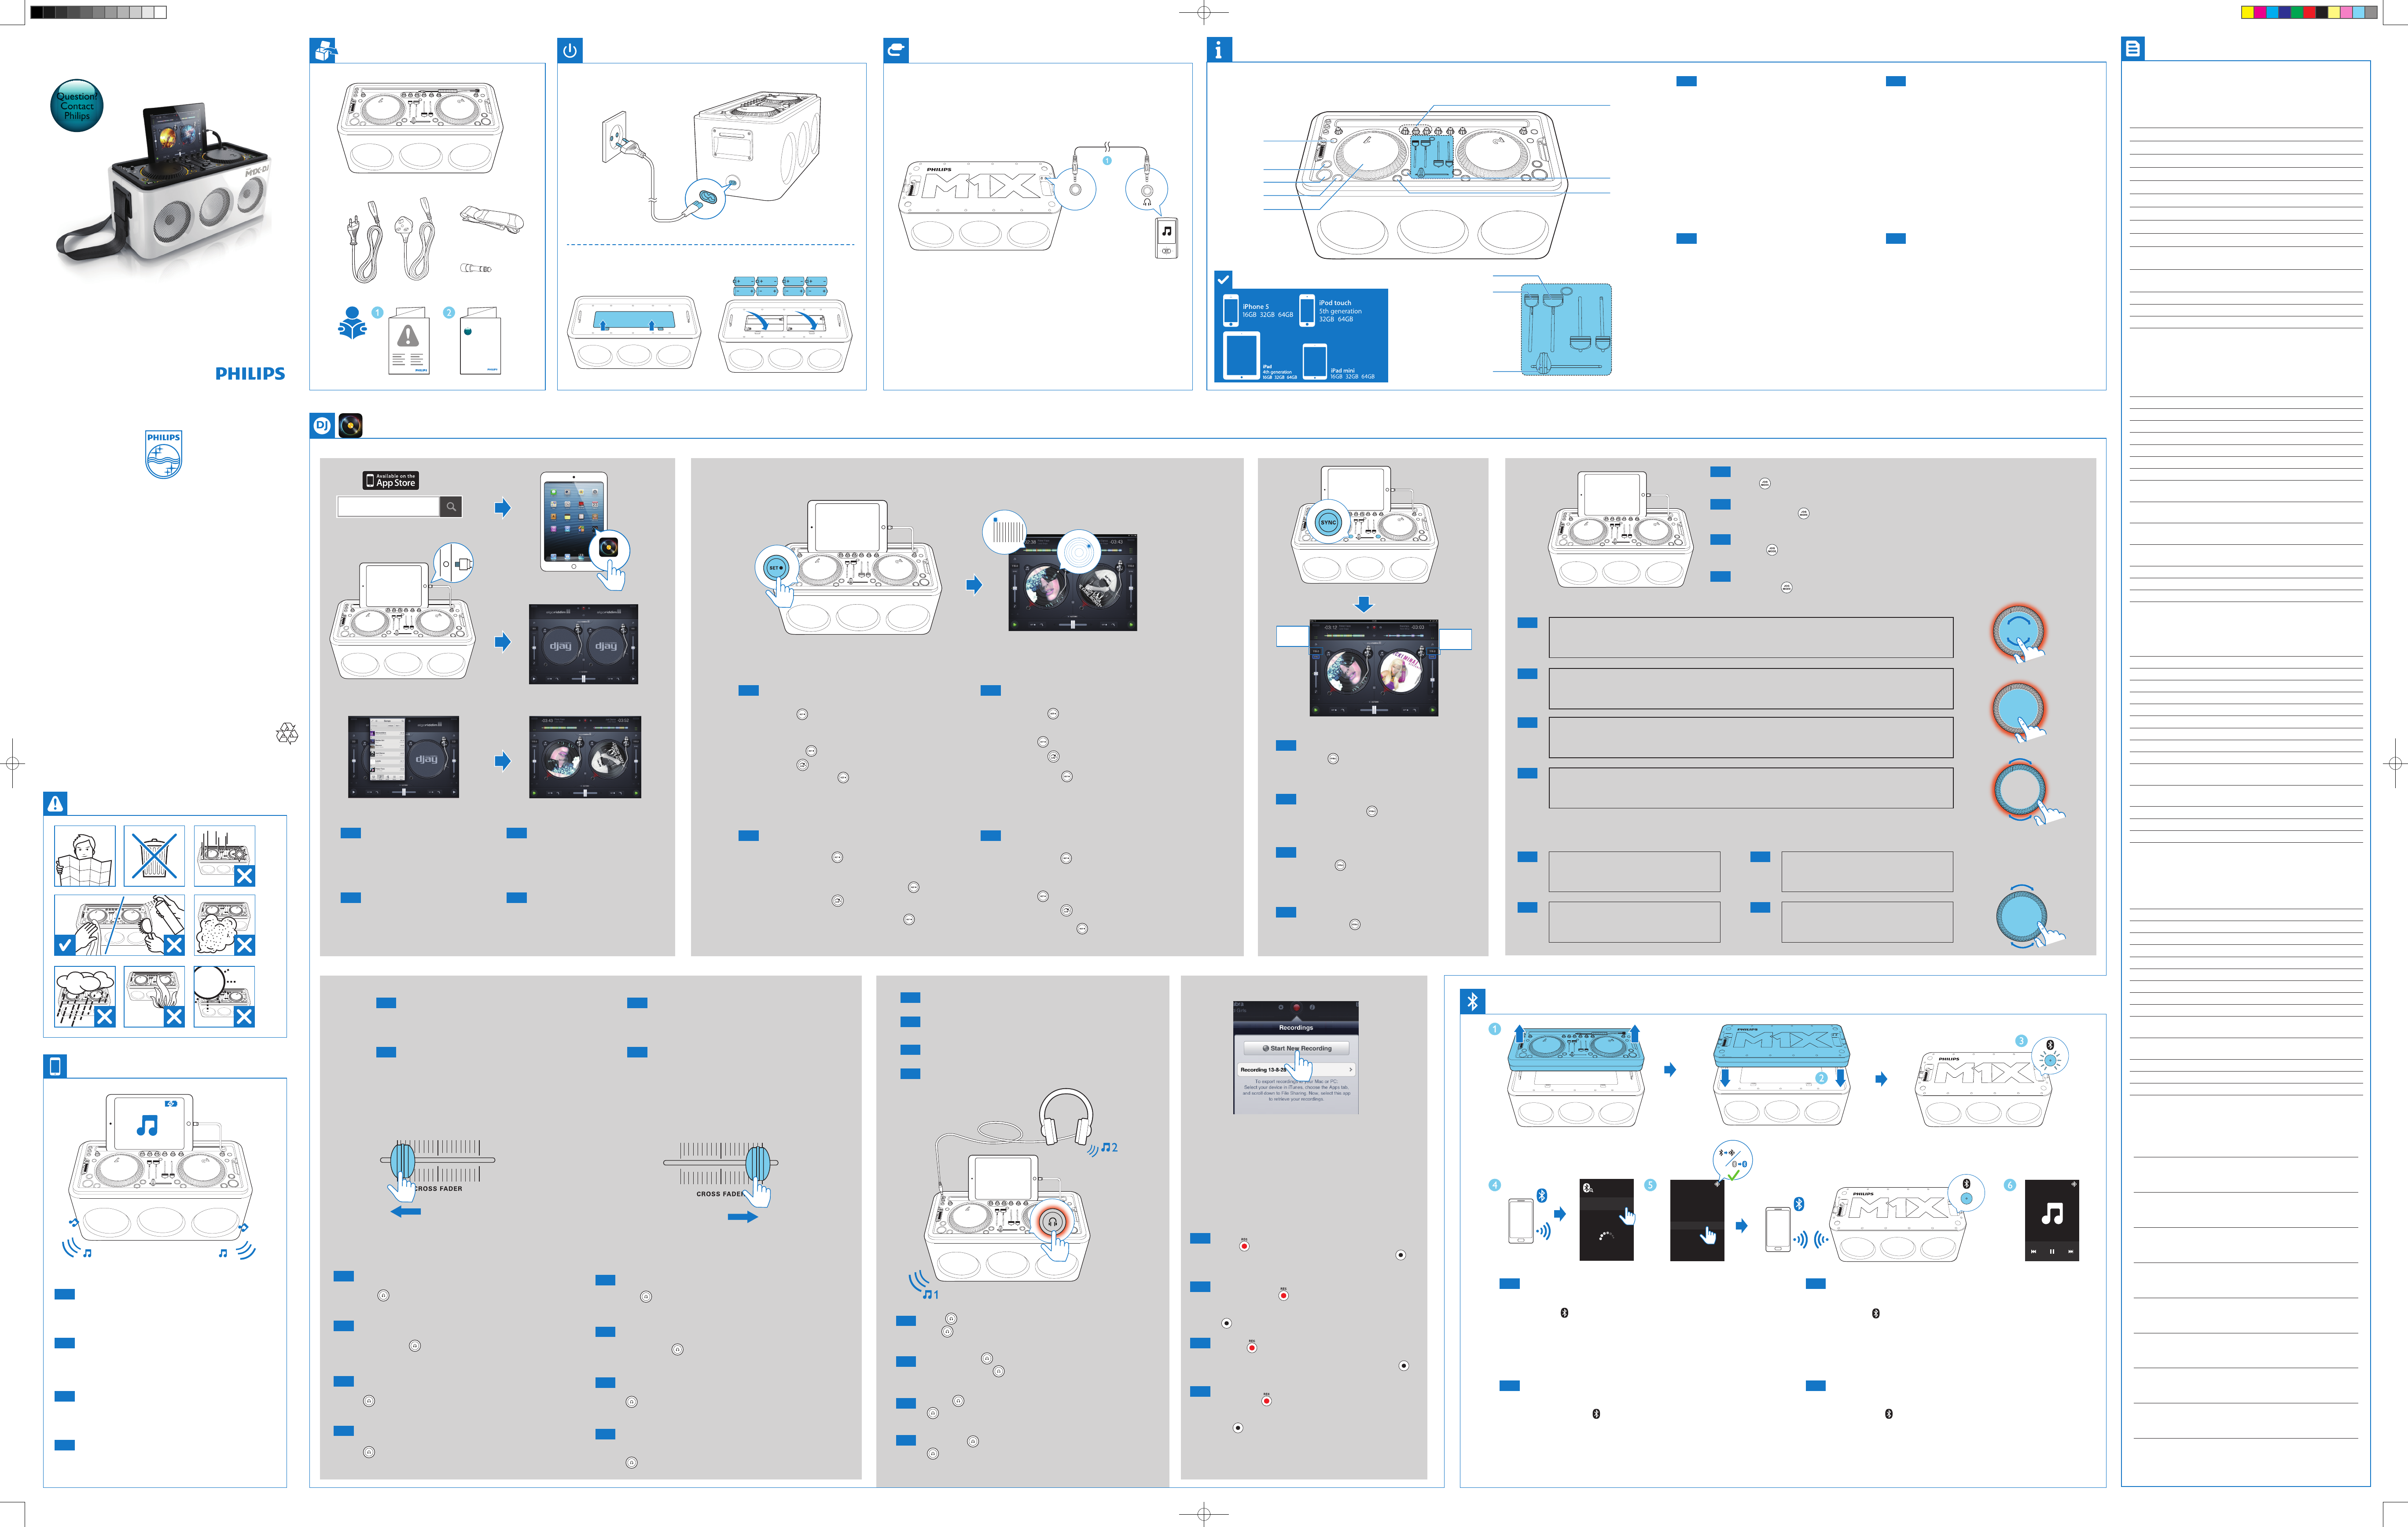
1
Jog mode
2
Play the track from the cue point
3
Play/pause
4
Set cue point
5
Turntable
6
Monitor the track through headphones
7
Synchronize the tempo of the track with the one
playing on the other turntable
8
Adjust low/mid/high frequency
9
Cross fader
10
Tempo
11
Volume
1
Skift tilstand
2
Afspil nummeret fra programmeringspunktet
3
Afspil/pause
4
Indstil programmeringspunkt
5
Pladespiller
6
Hold øje med nummeret vha. hovedtelefonerne
7
Synkroniser nummerets tempo med det, der
afspilles på den anden pladespiller
8
Juster lave/middel/høje frekvenser
9
Cross-fader
10
Tempo
11
Lydstyrke
1
Jog-Modus
2
Titel ab dem Einsatzpunkt wiedergeben
3
Wiedergabe/Pause
4
Einsatzpunkt festlegen
5
Plattenteller
6
Überwachen des Titels über die Kopfhörer
7
Synchronisieren Sie das Tempo des Titels mit
dem Titel, der auf dem anderen Plattenteller
wiedergegeben wird
8
Überblendung
9
Tempo
10
Lautstärke
1
Režim jog
2
Přehrávání skladby od cue bodu
3
Přehrávání/pozastavení
4
Nastavení cue bodu
5
Deck
6
Poslech skladby přes sluchátka
7
Synchronizace tempa skladby se skladbou na
druhém decku
8
Nastavení nízké/střední/vysoké frekvence
9
Crossfader
10
Tempo
11
Hlasitost
1
Connect the iPod/iPhone/iPad with the device
through the Lightning connector.
2
Play music on iPod/iPhone/iPad.
1
Propojte zařízení iPod/iPhone/iPad s přístrojem
prostřednictvím konektoru Lightning.
2
Přehrávání hudby na zařízení iPod/iPhone/iPad.
1
Tilslut din iPod/iPhone/iPad til enheden via
Lightning-stikket.
2
Afspil musik på din iPod/iPhone/iPad.
1
Verbinden Sie das iPod-/iPhone-/iPad-Gerät über den
Lightning-Anschluss.
2
Wiedergeben von Musik auf einem iPod/iPhone/iPad
1
Download the djay 2 app.
2
Connect your iPod/iPhone/iPad to the
device.
3
Launch the djay 2 app and load tracks.
1
Download djay 2-app’en.
2
Tilslut din iPod/iPhone/iPad til enheden.
3
Start djay 2-app’en, og indlæs numre.
1
Laden Sie die djay 2-App herunter.
2
Verbinden Sie den iPod bzw. das iPhone/iPad
mit dem Gerät.
3
Starten Sie die djay 2-App und laden Sie Titel.
1
Stáhněte si aplikaci djay 2.
2
Připojte zařízení iPod/iPhone/iPad
k přístroji.
3
Spusťte aplikaci djay 2 a načtěte skladby.
Set cue point
1
Choose a start point.
2
Press to set the cue point.
» The cue point is displayed as a white dot on the
visual waveform of the track or on the turntable
in djay 2.
» The lights after the cue point is set.
3
Press to play the track from the set cue point.
Note: Press and hold to clear the cue point.
Indstil programmeringspunkt
1
Vælg et startpunkt.
2
Tryk på for at indstille programmeringspunktet.
» Programmeringspunktet vises som en hvid prik på den
visuelle bølgeform i nummeret eller på pladespilleren i djay 2.
»
lyser, efter at programmeringspunktet er indstillet.
3
Tryk på for at afspille nummeret fra det indstillede program-
meringspunkt.
Bemærk: Hold nede for at slette programmeringspunktet.
Einsatzpunkt festlegen
1
Wählen Sie einen Anfangspunkt.
2
Drücken Sie , um den Einsatzpunkt festzulegen.
» Der Einsatzpunkt wird als weißer Punkt in der visuellen
Wellenform des Titels oder auf dem Plattenteller in djay 2
angezeigt.
» leuchtet auf, nachdem der Einsatzpunkt festgelegt wurde.
3
Drücken Sie , um den Titel ab dem festgelegten Einsatzpunkt
wiederzugeben.
Hinweis: Halten Sie gedrückt, um den Einsatzpunkt zu
löschen.
Nastavení cue bodu
1
Vyberte počáteční bod.
2
Stisknutím tlačítka nastavíte cue bod.
» Cue bod se zobrazuje jako bílá tečka na vizuální
křivce skladby nebo na decku v aplikaci djay 2.
» Po nastavení cue bodu se rozsvítí tlačítko .
3
Stisknutím tlačítka začne přehrávání skladby od
nastaveného cue bodu.
Poznámka: Stisknutím a podržením tlačítka cue
bod odstraníte.
Synchronize the tempo
Press to synchronize the tempo of the track to
the track playing on the other turntable.
Synchronizace tempa
Stisknutím tlačítka synchronizujete tempo
skladby se skladbou přehrávanou na druhém decku.
Synkroniser tempoet
Tryk på for at synkronisere nummerets tempo
med det spor, der afspilles på den anden pladespiller.
Synchronisieren des Tempos
Drücken Sie , um das Tempo des Titels zu synchro-
nisieren mit dem Titel, der auf dem anderen Plattentell-
er wiedergegeben wird.
Jog mode
Press to switch between scratch mode and search mode.
Režim jog
Stisknutím tlačítka přepínáte mezi režimem skrečování a režimem vyhledávání.
Skift tilstand
Tryk på for at skifte mellem scratch-tilstand og søgetilstand.
Jog-Modus
Drücken Sie , um zwischen Scratch- und Suchmodus zu wechseln.
Scratch mode:
Rotate the the inner area of the turn-
table to generate the scratch sound.
Režim skrečování:
Otáčením vnitřní části decku můžete
skrečovat.
Scratch-tilstand:
Drej den inderste del af pladespilleren
for at lave scratch-lyden.
Scratch-Modus:
Drehen Sie den inneren Bereich des
Plattentellers, um zu scratchen.
Search mode
Rotate the turntable to fast forward or rewind
the track.
Søgetilstand
Roter pladespilleren for at søge hurtigt frem
eller tilbage i et nummer.
Režim vyhledávání
Při otáčení decku můžete rychle přetáčet
skladbu dopředu nebo dozadu.
Suchmodus
Drehen Sie den Plattenteller, um den Titel
schnell vor- oder zurückzuspulen.
Rotate the outer area of the turn-
table to change the pitch of the track.
Otáčením vnější části decku měníte
tóninu skladby.
Drej den yderste del af pladespilleren
for at ændre nummerets toneart.
Drehen Sie den äußeren Bereich des
Plattentellers, um die Tonlage des
Titels zu ändern.
Touch the inner area of the turntable to
pause the playback.
Stisknutím vnitřní části decku poza-
stavíte přehrávání.
Berør den inderste del af pladespilleren
for at sætte afspilningen på pause.
Berühren Sie den inneren Bereich
des Plattentellers, um die Wiedergabe
anzuhalten.
Adjust the cross fader
Slide the cross fader to adjust the output balance be-
tween the tracks playing on the two turntables.
Juster cross-fader
Skub cross-faderen for at justere outputbalancen mel-
lem de numre, der afspilles på de to pladespillere.
Einstellen des Überblenders
Schieben Sie den Überblender, um die Ausgabebalance
zwischen den Tracks, die auf den beiden Plattentellern
a/jointfilesconvert/219742/bgespielt werden, anzupassen.
Nastavení crossfaderu
Přesouváním crossfaderu určujete vyrovnání výstupu
mezi skladbami přehrávanými ze dvou decků.
When the cross fader is slid to the left:
The track on turntable 1 is played through the micro system.
The 2 lights and the track on turntable 2 is played through
the headphones.
Při přesunutí crossfaderu doleva:
Mikrosystém přehrává skladbu na decku 1.
Svítí kontrolka 2 a skladba na decku 2 se přehrává do
sluchátek.
Når cross-faderen skubbes mod venstre:
Nummeret på pladespiller 1 afspilles via mikrosystemet.
2 lyser, og nummeret på pladespiller 2 afspilles via hovedtele-
fonerne.
Wenn Sie den Überblender nach links schieben:
Wird der Titel auf Plattenteller 1 über das Mikrosystem a/jointfilesconvert/219742/bgespielt.
2 leuchtet auf, und der Titel auf Plattenteller 2 wird über die
Kopfhörer wiedergegeben.
When the cross fader is slid to the right:
The track on turntable 2 is played via the micro system.
The 1 lights and the track on turntable 1 is played through
the headphones.
Při přesunutí crossfaderu doprava:
Mikrosystém přehrává skladbu na decku 2.
Svítí kontrolka 1 a skladba na decku 1 se přehrává do
sluchátek.
Når cross-faderen skubbes mod højre:
Nummeret på pladespiller 2 afspilles via mikrosystemet.
1 lyser, og nummeret på pladespiller 1 afspilles via
hovedtelefonerne.
Wenn Sie den Überblender nach rechts schieben:
Wird der Titel auf Plattenteller 2 über das Mikrosystem ab-
gespielt.
1 leuchtet auf, und der Titel auf Plattenteller 1 wird über
die Kopfhörer wiedergegeben.
Monitor tracks via headphones
Poslech skladeb přes sluchátka
Hold øje med nummeret vha. vedtelefonerne
Überwachen von Titeln über die Kopfhörer
Press of either turntable.
The lights and you can monitor the track playing from this turn-
table through the headphones.
Stiskněte tlačítko některého z decků.
Rozsvítí se kontrolka a skladbu přehrávanou na tomto decku
můžete poslouchat přes sluchátka.
Tryk på på en af pladespillerne.
lyser, og du kan holde øje med det nummer, der afspilles på denne
pladespiller vha. hovedtelefonerne.
Drücken Sie auf einem der Plattenteller.
leuchtet auf, und Sie können den Titel, der auf dem entsprechenden
Plattenteller wiedergegeben wird, über die Kopfhörer überwachen.
Record
Press to record the the mixed track, press again to stop
recording.You can check the recorded tracks by tapping
on djay 2.
Nahrávání
Stisknutím tlačítka začnete nahrávat mixovanou skladbu,
opětovným stisknutím nahrávání ukončíte.
Nahrané skladby si můžete poslechnout po stisknutí tlačítka
v aplikaci djay 2.
Optagelse
Tryk på for at optage det mixede nummer, tryk igen for at
stoppe optagelsen.
Du kan kontrollere de optagede numre ved at trykke på på
djay 2.
Aufnahme
Drücken Sie , um den gemischten Titel aufzuzeichnen, und
drücken Sie es zum Beenden der Aufnahme erneut.
Sie können die aufgezeichneten Titel prüfen, indem Sie in djay 2
auf tippen.
1
Pull up the top panel with both hands and ip it over.
2
With the DJ controller side facing downwards, fully insert the top panel back to
ensure a secure t.
3
Press on the top panel and the Bluetooth indicator blinks blue.
4
On the device to be paired with the speaker system, enable Bluetooth function and
start search.
5
Select “M1X-DJ” to pair and connect to the speaker system.
» When the connection is successful, the Bluetooth indicator on the speaker turn
to solid blue.
6
Play music on the paired device.
1
Træk det øverste panel opad med begge hænder, og vend det rundt.
2
Med DJ controller-siden vendt nedad sættes det øverste panel helt på igen for at
sikre, at det sidder godt fast.
3
Tryk på på det øverste panel, og Bluetooth-indikatoren blinker blåt.
4
På enheden, der skal parres med højttalersystemet, skal du aktivere Bluetooth-funk-
tionen og starte søgningen.
5
Vælg “M1X-DJ” for at parre og tilslutte til højttalersystemet.
» Når forbindelsen er oprettet, lyser Bluetooth-indikatoren på højttaleren konstant
blåt.
6
Afspil musik på den parrede enhed.
1
Ziehen Sie die obere Abdeckung mit beiden Händen heraus, und drehen Sie sie um.
2
Stecken Sie die Abdeckung mit der DJ-Controller Seite nach unten wieder vollständig hinein,
um einen sicheren Sitz zu gewährleisten.
3
Drücken Sie auf der oberen Abdeckung, und die Bluetooth-Anzeige blinkt blau.
4
Aktivieren Sie die Bluetooth-Funktion auf dem Gerät, das mit dem Lautsprechersystem
gekoppelt werden soll, und starten Sie die Suche.
5
Wählen Sie “M1X-DJ”, um eine Kopplung und Verbindung mit dem Lautsprechersystem herzustellen.
» Wenn die Verbindung erfolgreich ist, leuchtet die Bluetooth-Anzeige auf dem Lautspre-
cher dauerhaft blau.
6
Geben Sie Musik auf dem gekoppelten Gerät wieder.
1
Oběma rukama zvedněte panel a obraťte ho vzhůru nohama.
2
Jakmile budou ovladače DJ směřovat dolů, zcela zasuňte zpět horní panel tak, aby
bezpečně zapadl.
3
Stiskněte tlačítko na horním panelu a kontrolka Bluetooth modře blikne.
4
Na zařízení, které chcete spárovat se systémem reproduktorů, povolte funkci Blue-
tooth a zahajte vyhledávání.
5
Výběrem možnosti „M1X-DJ“ spárujte a připojte zařízení k systému reproduktorů.
» Jakmile bude úspěšně navázáno spojení, kontrolka Bluetooth na reproduktoru
bude trvale modře svítit.
6
Nyní můžete přehrávat hudbu na spárovaném zařízení.
EN
Specications
Rated Output Power 80 W RMS
Frequency Response 60 Hz - 16 kHz, ±3 dB
Signal to Noise Ratio > 65 dBA
Audio-in Link 0.5 V RMS 20 kohm
Speaker Impedance 8 ohm
Speaker Driver 2 x 5.25 '' full range
Sensitivity > 85 dB/m/W
AC power (power adaptor) 100-240V~, 50/60Hz
Operation Power Consumption 40W
Dimensions
- Main Unit (W x H x D) 380 x 186 x 227mm
Weight
- Main Unit 7.35 kg
Frequency band 2.4000 GHz - 2.4835 GHz ISM Band
Range 8 meters(free space)
Standard Bluetooth 2.1 + EDR
CS
Specikace
Jmenovitý výstupní výkon 80 W RMS
Kmitočtová charakteristika 60 Hz–16 kHz, ±3 dB
Odstup signál/šum >65 dBA
Audio-in Link 0,5 V RMS 20 kohmů
Impedance reproduktoru 8 ohmů
Vinutí reproduktoru 2 x 5,25'' širokopásmový
Citlivost >85 dB/m/W
Napájení střídavým proudem (napá-
jecí adaptér) 100–240 V~, 50/60 Hz
Spotřeba elektrické energie při
provozu 40 W
Rozměry
- Hlavní jednotka (Š x V x H) 380 x 186 x 227 mm
Hmotnost
– Hlavní jednotka 7,35 kg
Frekvenční pásmo 2,4000–2,4835 GHz ISM Band
Dosah 8 metrů (volný prostor)
Standardní Bluetooth 2.1 + EDR
DA
Specikationer
Vurderet effekt 80 W RMS
Frekvensgang 60 Hz - 16 kHz, ±3 dB
Signal-/støjforhold > 65 dBA
Lydindgangs-link 0,5 V RMS 20 kohm
Højttalerimpedans 8 ohm
Højttalerdriver 2 x 5,25 " bredspektret
Sensitivitet > 85 dB/m/W
Vekselstrøm (lysnetadapter) 100-240 V~, 50/60 HZ
Strømforbrug ved drift 40 W
Mål
- Hovedenhed (B x H x D) 380 x 186 x 227 mm
Vægt
- Hovedenhed 7,35 kg
Frekvensbånd 2,4000 GHz - 2,4835 GHz ISM-bånd
Område 8 meter (i fri luft)
Standard Bluetooth 2.1+ EDR
DE
Technische Daten
Ausgangsleistung 80 W RMS
Frequenzgang 60 Hz – 16 kHz, ± 3 dB
Signal/Rausch-Verhältnis > 65 dBA
Audio-In-Verbindung 0,5 V RMS 20 Kiloohm
Lautsprecherimpedanz 8 Ohm
Lautsprechertreiber 2 x 5,25" Full Range
Empndlichkeit > 85 dB/m/W
Netzteil (Netzadapter) 100 bis 240 V~, 50/60 Hz
Betriebs-Stromverbrauch 40 W
Abmessungen
- Hauptgerät (B x H x T) 380 x 186 x 227 mm
Gewicht
- Hauptgerät 7,35 kg
Frequenzband 2.4000 GHz bis 2.4835 GHz (Band ISM)
Reichweite 8 Meter (freier Raum)
Standard Bluetooth -Version: 2.1 + EDR
Note
DS8900_10_Short UM_V1.0_BOOK1.indd 1 9/25/2013 3:37:14 PM
 (4 pages)
 (4 pages)

 (2 pages)
 (2 pages)
 Manymanuals.com
 Manymanuals.de
 Manymanuals.fr
 Manymanuals.it
 Manymanuals.pl
 Manymanuals.cz
 Manymanuals.es
 Manymanuals-pt.com
Comments to this Manuals